- Yoga can work for many different types of bodies, many different stages in life and for each person's many different moods. While for some an intense yoga class may seem like the way to go, for others a gentle restorative class may be optimal. For some people their needs change daily. However, the restorative effects of yoga should never be over-looked, no matter what age, and sometimes slowing down the practice, going deeper in poses and just feeling the restorative power of them does wonders for the body.
- The guiding principle of restorative yoga is that support creates release. Every pose is a variation on that theme, and the aim of each pose is the same: Relaxation.
We work very hard in our lives and while we may sleep, we rarely take time to rest. Restorative yoga poses help us learn to relax and rest deeply and completely. During deep relaxation all the organ systems of the body are benefited and a few of the measurable results of deep relaxation are the reduction of blood pressure, serum triglycerides and blood sugar levels in the blood, the increase of the "good cholesterol" levels, as well as improvement in digestion, fertility, elimination, the reduction of muscle tension, insomnia and generalized fatigue.
- When to practice
Restorative yoga postures can be practiced at any time of the day. Ideally, one would start their day with restorative yin poses and breath work. It is a great way to wake up the body and clear the mind before launching into the day. It is also beneficial to practice restorative postures at the end of the day, before bed. This can slow the body and mind down, and prepare the body for sleep. Many who practice restorative postures, at any time of the day, find that they sleep better and their energy levels are higher.
- What to expect
Restorative classes are usually very relaxing and are a good complement to more active practices. After you are set up in a pose with all your props, you will hold the pose for an extended period, often up to ten to twenty minutes. Although you are supported, you will definitely still feel the stretch. It's a relaxing style of practice that leaves you feeling open, refreshed and relaxed.
- Benefits of restorative yoga
Restorative Yoga focuses on relaxing the body in restful postures. Note that “rest” is different than sleep. Rest provides the body an oppotunity to renew and heal. Countless studies have proven the physical and emotional benefits of this. Restorative yoga, as well as other forms of yoga, help to trigger the parasympathetic nervous system also known as the PNS. The PNS is responsible for balancing the body and bringing its response system back into equalibrium. Stimulating the PNS helps to lower heart rate, blood pressure; it helps to healthily stimulate the immune system and keep the endocrine system operating healthily. When this system gets out of whack, or when the sympathetic nervous system, SNS gets over-stimulated, the PNS helps to bring all back in balance. It is believed that if the PNS is tapped out or under-active, illness pervades. Thus, forms of relaxation and meditation, that help to stimulate the PNS are generally beneficial for overall body health. David Spiegel, M.D., author of Living Beyond Limits, reports, “In medicine, we are learning that physical problems, such as high blood pressure and heart disease, can be influenced by psychological interventions, such as relaxation training. Indeed, the Food and Drog Administration issued a report recommending these non-drug approaches as the treatment of choice for milder forms of hypertension. Mind and body are connected and must work together and this should be a powerful asset in treating medical illness.”
- Recommended props for restorative yoga
In restorative yoga, props are used for support the body so that you can hold poses for longer, allowing you to open your body through passive stretching. The more your body is supported in poses the deeper the sense of relaxation. With props it is easier for the body to get into certain poses, and thus, surrender to the pose. These props include: yoga block, yoga strap, blankets, yoga bolster, balls, chairs, wall, sandbags, eyebag.
- Four recommended restorative poses
While there are many restorative yoga poses, here are four basic ones that can help you to get started in a restorative practice. You will feel the benefits right away and you can practice them at home. Note: Everyone's body is different and some people may be uncomfortable in all variations of these poses. It is most important to listen to your body and not push it beyond its limits.
- Simple supported backbend
This pose helps to stretch the lower and middle back. It opens the chest and the shoulders as it releases stress that may have accumulated from sitting, working at a desk or in front of a computer. Fold your blanket in half and place it on your mat. Place the bolster on top of the blanket, the long side parallel with the width of your mat. Sit in front of the bolster and start lying over it sideways. So that you are lying on your side over the bolster. Once you feel stable, roll onto your back, using your elbows to support you if need be. Use your hand to support your neck as you lower your back down over the bolster. Aim to lie over the bolster so that it is supporting your middle back and so that your shoulders are resting comfortably on the floor (not on the bolster.) If you have a long torso, you will want to increase the height of the bolster by adding a folded blanket on top of it. If you have a short torso, you may need to use a rolled yoga mat or blanket in lieu of a bolster. The goal for all is to have the shoulder touching the floor and the head resting comfortably so the neck is not crunched or over-stretched. Place an eyebag over your eyes and begin the breath deeply. Stay here for 30 seconds, breathing, then evaluate the position to see how your lower back feels. If you have any discomfort, slide up over the bolster slightly (moving your head farther away from it,) so that it is hitting a lower part of your back. Make sure that your chest is opening in this pose and that your ribs are moving away from your lower abdomen (and abdominal organs).
- Supported viparita karani (legs up the wall pose)
Putting the legs up the wall is a very gentle way to do an inversion. It brings blood to the head and heart; and it can be practiced by those who are not inverting (such as those with high blood pressure or those on their menstural cycle). Use a yoga bolster or fold and stack two thick blankets, creating a support that is 6 inches high and long enough to prop your hips and lower back. Place the blankets or bolster (length is parallel to wall) a few inches away from the wall. Curl your legs into the chest and turn onto your left side. Use your left arm as a support, and then roll onto your right hip while sweeping your legs up against the wall. Place your back and hips on the blanket. Your body should be in a straight line from navel to top of head and it should be perpendicular to the wall. The bolster or blankets should be supporting from the top of your tailbone all the way to your mid-back. Your shoulder blades do not need to be on the blanets but should be resting comfortably on the floor. Try to keep your legs straight and aim to have the back of your thighs lying against the wall. To do this, try climbing each leg up the wall to get your hips closer to the wall. (If this is a problem for your hamstrings, slide your support away from the way and make sure there is a gap between your thighs and the wall.) Place an eyebag over your eyes and breath. Allow your breath to relax your body as you settle into the position. Stay here for anywhere from 3 to 20 minutes, or as long as it feels good. Just remember to continue to breath into your lower belly, and to allow your body-joints and muscles to open into the posture.
- Supported paschimottanasana (forward fold)
This posture is good for people with lower back problems or tight hamstrings. It is a wonderful posture to rest in as while opening the leg muscles and stretching the back. Sit in dandasana on your mat: legs outstretching, ankles together, hands pushing into earth by hips. Place a bolster or a rolled blanket underneath your knees. This way your knees are comfortably bent. This is especially important for anyone who has a knee or hamstring injury. Take a pillow and place it on your legs or lap, or wherever is best so that you can rest your upper body on it as you fold over your legs. As you begin to slowly fold over your legs, you should make sure that you feel no pain. A comfortable stretching sensation is good, but if you feel any pain in the legs or in the back, increase the height of the blankets under your legs. You may want to use a block to prop your head on top of the pillow, so there is no strain in the neck or shoulders. Close your eyes and breath here for as long as you want. Allowing your body to relax and open into the posture.
- Supported adho mukha virasana (downward facing hero)
This pose is also known as supported child's pose. It can be very restorative for a number of ailments and conditions. This posture is good for people with fatigue, headaches, hypertension, neck problems, indigestion, menstrual pain / PMS. Sit on your mat on your knees with your knees spread apart. Place a bolster or two between your legs and pull it in towards you. Lie down onto the bolster and place your arms out in front to either side. Place your face nose down in a towel cradle or spend equal time on each cheek. Move the bolsters and add or subtract support until there is little tension in your thighs and low back. Stay here and breath slowly and deeply for 2 or more minutes.
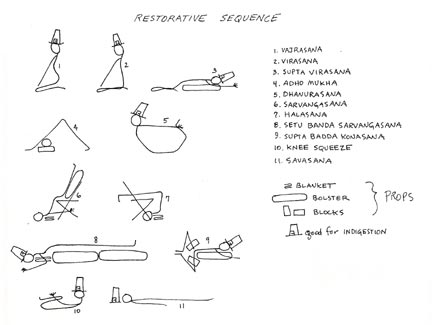
And here is an other, more advanced sequence. Enjoy!